!!! Warning !!! K3s requires the
CONFIG_CGROUP_NSkernel module, witch is found in the mainline kernel versio 4.6 and later. This phone (Galaxy A40) only supports up to the downstream kernel version 4.4. Therefor, it can’t run any workloads, even tho K3s was able to install. (Witch basically made it a brick.) Check the capabilities of your phone model before proceeding with this guide.
Android phones run Linux. So they can run Kubernetes, right? That question popped up in my head, when I was looking at an old Samsung Galaxy A40 I had laying around. Then I thought, “That could be a fun project.”, so that’s exactly what I did.
In this article, I walk you through everything I did to make it work, so you can replicate it. For your sanity, I won’t contain everything I tried and every error message I got. This project easily took three weekend’s, reading more error’s and fixing more issues then I’d like to admit. Therefore, it is not recommended if you hate troubleshooting.
Hope you enjoy!
Disclaimer
This is NOT a production grade Kubernetes deployment. Running Kuberbetes on a smartphone, with in my case an Exynos chip it is not built nor designed for, is highly unstable and for educational and fun purposes only.
Expect error messages like the one’s below, witch will be gone in a few seconds and back at random moments. (Commands run a few seconds after each other.)
a40-k3s:~$ sudo kubectl get nodes
NAME      STATUS   ROLES                  AGE   VERSION
a40-k3s   Ready    control-plane,master   15m   v1.28.5+k3s1
a40-k3s:~$ sudo kubectl get nodes
The connection to the server 127.0.0.1:6443 was refused - did you specify the right host or port?
a40-k3s:~$ sudo kubectl get nodes
Error from server (ServiceUnavailable): the server is currently unable to handle the request (get nodes)
a40-k3s:~$ sudo kubectl get nodes
NAME      STATUS   ROLES                  AGE   VERSION
a40-k3s   Ready    control-plane,master   15m   v1.28.5+k3s1
a40-k3s:~$
Installing PostMarketOS on a Samsung Galaxy A40
!!! Warning !!! This will overwrite the existing Android Operating System and bootloader on your device with ABSOLUTELY NO GUARANTY of going back. Following this guide is at your own risk and may brick your device, for witch I hold no responsibility. Make sure that whatever you are doing is worth it.
Creating a PostMarketOS Recovery zip
The first step is creating the new operating system (OS) that will go onto your device.
Note: I used a Debian based machine since this tool wouldn’t work on my MacBook Pro. Your milage may vary.
Install pmbootstrap
Simply clone the GitHub Repository and run the script inside it.
git clone https://gitlab.postmarketos.org/postmarketOS/pmbootstrap.git ~/pmbootstrap
sudo ln -s ~/pmbootstrap/pmbootstrap.py /usr/local/bin/pmbootstrap
Initialize an image
Simply run the pmbootstrap init command to start the Initialization. This will start the process and it will ask you how you would like your OS image to be. Below is an overview of the questions with answers I gave.
| Question | Answer |
|---|---|
| Work path | default |
| pmaports path | default |
| Channel | edge |
| Vendor | samsung (yours may vary) |
| Device codename | a40 (yours may vary) |
| Continue (downstream port warning) | y |
| Username | quinten (pick your own username) |
| audio-backend | default |
| wifi backend | default |
| usb-moded profile | default |
| User interface | console |
| Install systemd | never |
| Change additional options | n |
| Extra packages | openssh-server (REQUIRED unless you hate yourself) |
| Use host timezone | y |
| Locale | en_US |
| Hostname | a40-k3s (pick your own hostname for the device) |
| Build outdated packages | y |
| Zap chroots | y |
Build the recovery zip
After the image is created, you have to make it into a zip file, by installing it. This can be done using the command below.
pmbootstrap install --android-recovery-zip --recovery-install-partition=dataDuring this install, it will ask you to create a password for the user you just chose.
Find the recovery zip
To find the file after it has been created, use the find command below.
find ~/.local/var/pmbootstrap -name "pmos-*.zip"The output will look something like this.
~/.local/var/pmbootstrap/chroot_buildroot_aarch64/var/lib/postmarketos-android-recovery-installer/pmos-samsung-a40.zipOnly thing left to do, is putting it onto a micro SDCX card, that you can later put in your phone. I created the image on an Ubuntu VM and moved it to my Mac via SCP before moving it to an micro SD-card. This part will depend on your setup.
Preparing the A40
First thing to do on the phone, is allowing yourself to put another OS on it. You can do this by enabling OEM-unlocking in the developer options. You will require an internet connection during this part, since the phone needs to phone home to Samsung.
Simply go to Settings > About > click the Build number 7 or more times to enable Developer Options. Then go to Settings > Developer Options and enable the OEM-unlocking.
Now the hardest part. Wait. You’ll have to wait at least 7 days before Samsung allows your phone to let you alter it’s OS. Painfull I know. And it needs to be powered on and have internet to know if it’s time yet.
To know if your device is ready to go, enter the Download mode. This must be done from a powered off state, so power off the phone first. Then (on my A40 model), you must hold the volume up and volume down buttons simultaneously and while holding it, connect it to a laptop or PC over USB. When the screen becomes blue, you can let go. It should ask you to click the volume up button if you are sure to continu. You are.
In the top left corner, you should see some debug information. If it says KG STATE: Checking somewhere, it is not unlocked yet. Hold volume down and the power button till it shuts down. Then it will boot to Android again. Make sure it has internet and wait an extra day or so. If your device is ready, you can go to the next step.
Quick steps to enter download mode:
- Turn off device
- Hold volume up + volume down
- Connect to PC with USB
- When blue, let go
- Click volume up
KG STATE: Checking (device not unlocked yet)
Hold volume down and power to exit download mode.
Flashing TWRP onto the A40
When your device is unlocked, there are two files that must be flashed onto it. To do this, I used Odin v3.14 in a Windows VM. I tried Heimdall first, since it’s for Mac, but I did not succeed, so I went with Odin. I have no idea why it would be special or what it’s compatitors are, but it worked for me.
Note: This is a Windows Application. I also read a lot that certain drivers were needed to connect this Samsung phone, but my Windows 11 24H2 simply worked. Your mileage may vary.
vbmeta
The first file you need, is also the hardest to get. It patches something on the device, so that it let’s you do some stuff that you need. I’m not gonna pretend I completely understand, but I believe it’s a bootloader permission thing. I tried everything to get it. Even trying to create my own patched version, but I failed every time. Luckely for me, new day, new eyes and I found it pretty quickly. I ended up on this article from Magisk on the A40. They had a patched vbmeta file in the article for my device, but your mileage may vary.
You can also download the exact file I used from TEQcloud in case you have the same device.
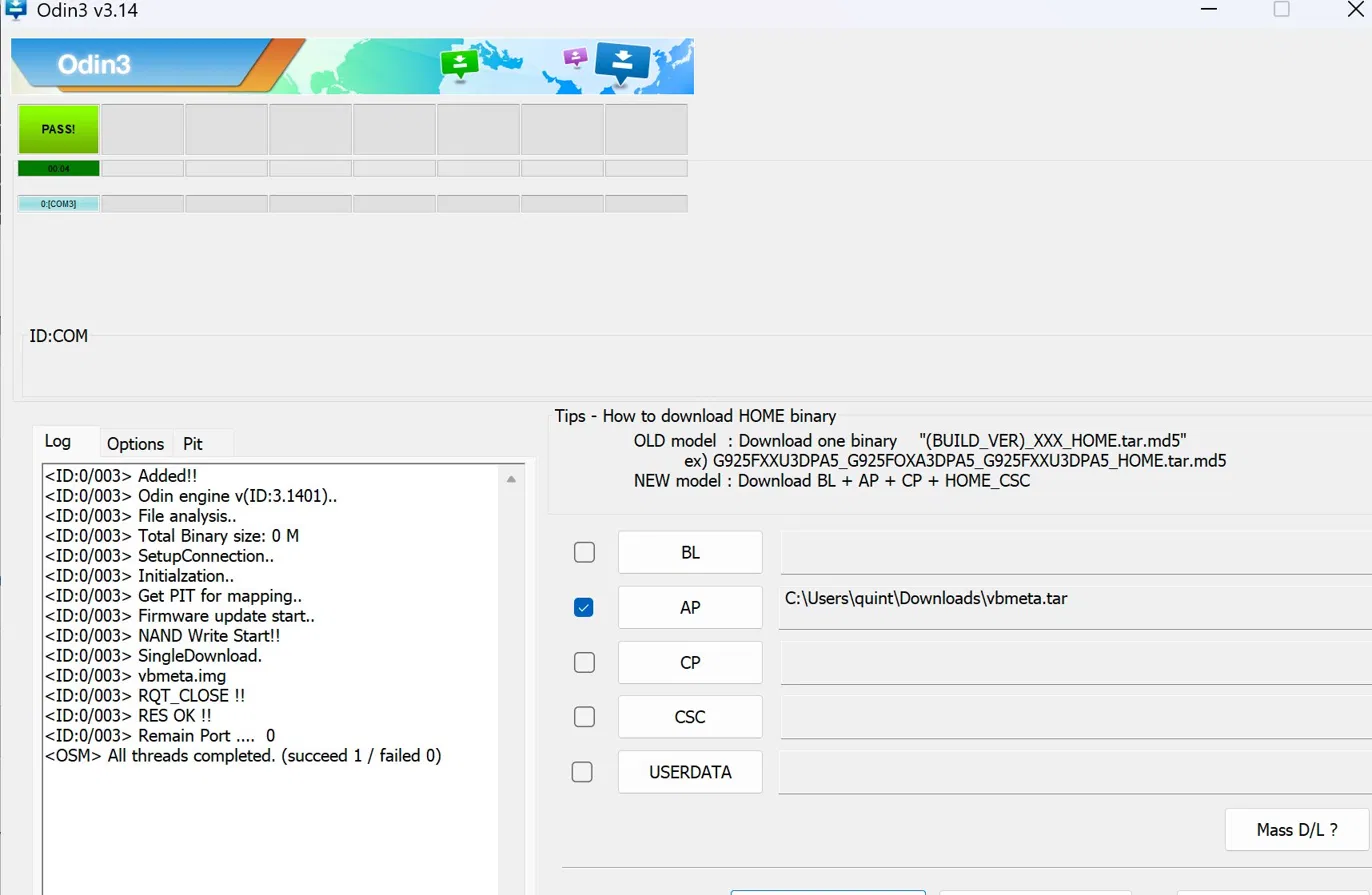
Once you have it, it’s simply connecting your device to your PC, while it is in download mode. Then:
- Open Odin
- Click AP and select the vbmeta.tar file you downloaded
- Under the Options tab, uncheck everything
- Click Start
When it’s done, the log should look something like in the screenshot below. That’s the first done.
TWRP Image
The second file is much easier to get. Just search for your device on the TWRP site. Click it and go to the Download Links (like shown below). Then just click the newest (top most) file that ends with .img.tar.

Once again, you can download the exact file I used from TEQcloud.
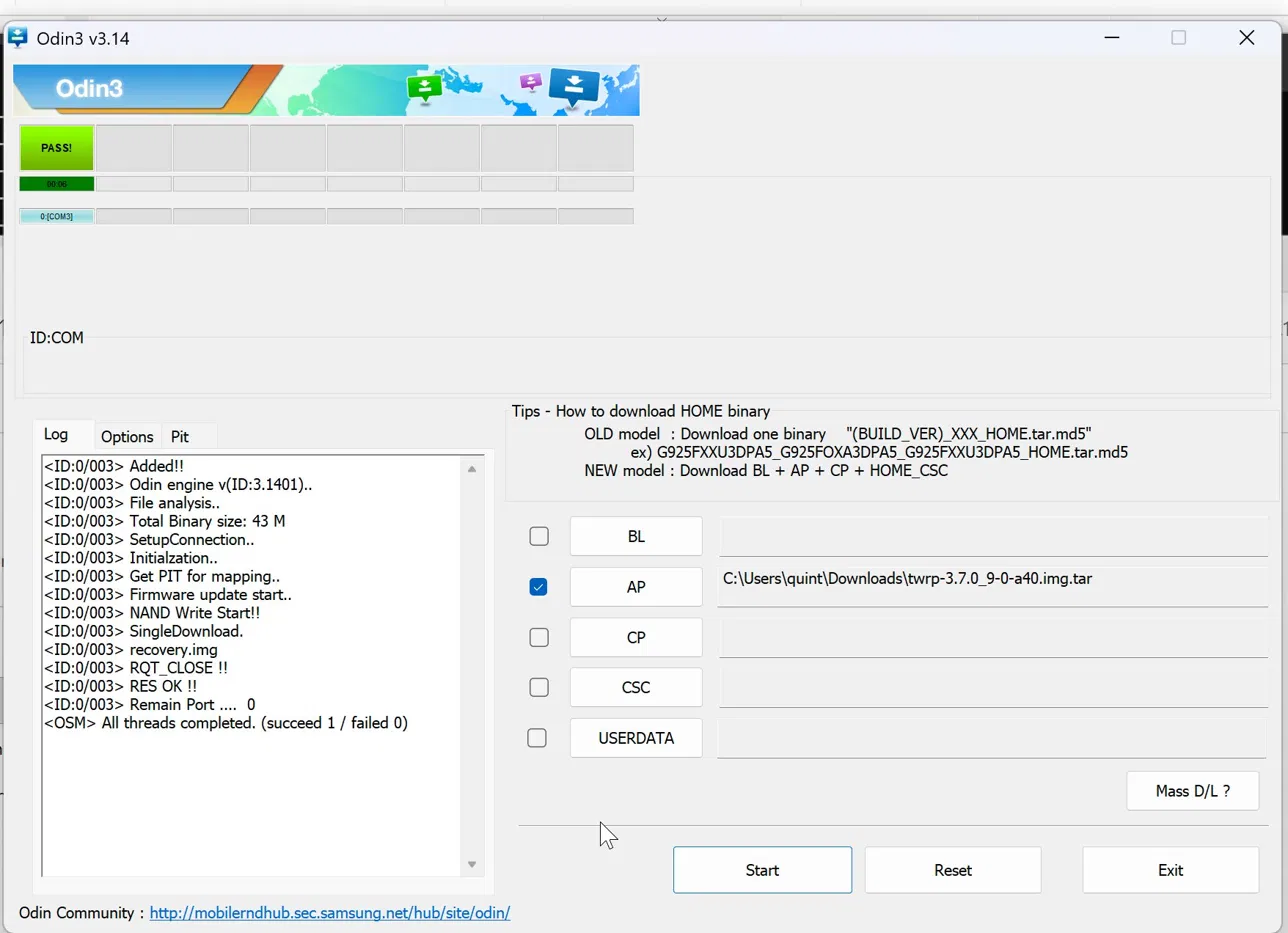
Once you have it, go back to Odin. Do the exact same as with the vbmeta.tar, but now select the TWRP file you just downloaded and click Start again.
Warning: You will have to restart your device before you can flash it the second time. You will have to be quick, so it does not try to boot into Android.
- Disconnect USB
- Hold volume down and power till it goes black
- Immediately hold volume up and volume down again
- Connect USB
- When blue, let go and click volume up once
- Also restart Odin and don’t forget to uncheck the options
Once everything is done, your screen should like this.
Installing PostMarketOS
After TWRP is flashed onto your device, you have to boot into it and install the new PostMarketOS onto your device. To boot into TWRP, follow these steps:
- Unplug USB cable
- Power + Volume Down button
- When screen goes black immediately change from Volume down to Volume up and keep holding the Power button
- When you see a Samsung logo, release the Power button
- Keep holding the Volume up button till you see the TWRP logo (it might reboot a few times before it does, keep holding)
Once in TWRP, keep the Keep system read only option OFF and Swipe the bar in the bottom to allow modifications.
Tip: If you want to be sure you get the timing right, watch this video at 14:44 to see the exact button timing.
Mount SDcard
Now, the first thing to do here, is mount the SDcard your zip file is on. To do this, click the Mount button. In here, uncheck everything except the SDcard. Then click the Select Storage in the bottom and choose the Micro SDcard and click OK. After that, go back to the main menu.
Wipe Data
Last thing before installing the new OS, is wiping the data. For this, go to Wipe from the main menu, click Format Data and type yes with your keyboard to confirm. Then go back to the main menu.
Install PostMarketOS Zip
From the main menu, click the Install button. Navigate to the zip file on the SDcard and select it. In my case pmos-samsung-a40.zip.
In the next screen, copy these settings:
- Zip signature verification: OFF
- Skip digest check before installing zip: OFF
- Reboot after installation is complete: OFF
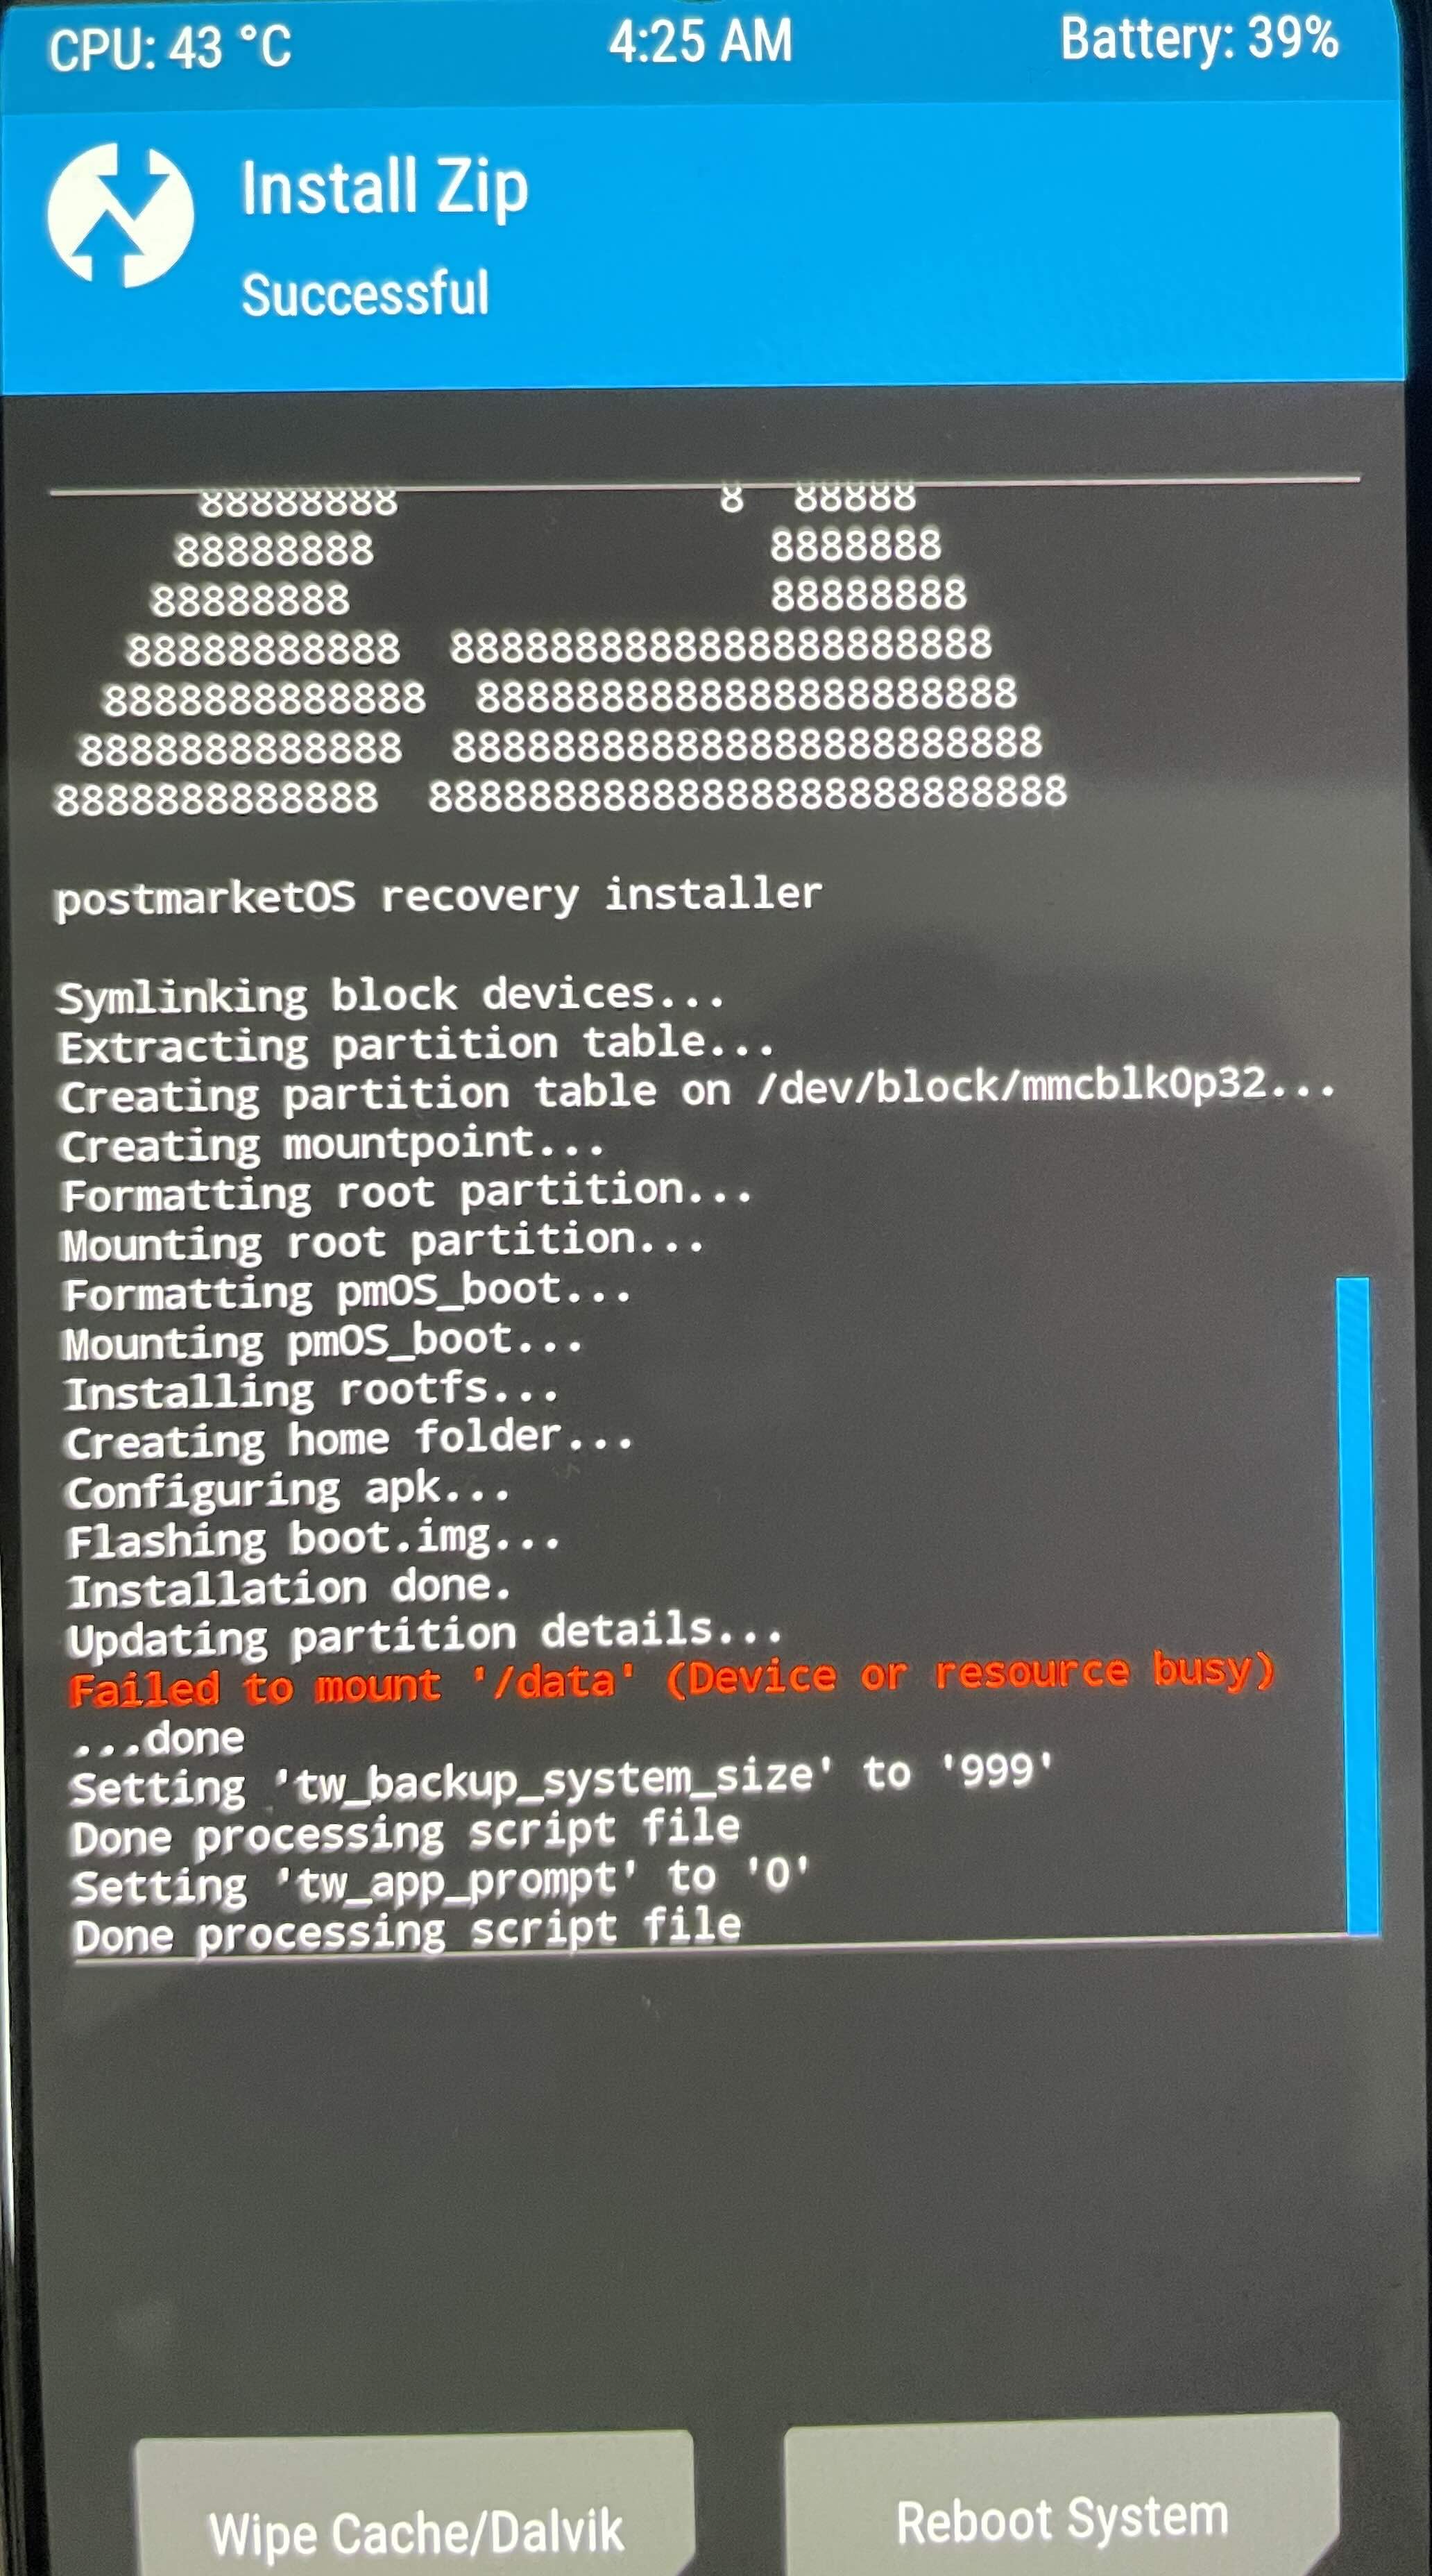
Then, swipe to begin the flashing process. Your screen should look something like this:
Note: You can safely ignore the mount error on
/data.
Setting up PostMarketOS
After PostMarketOS is installed, you reboot your device. It might reboot a few times, but after that it will boot into PostMarketOS. In here, there are a few things you need to setup.
Setting up network
Before you can SSH into the phone, you’d need to connect a keyboard to your phone and connect it to Wi-Fi.
To do this, simply create and start a connection. You can name it whatever you want. In my example I named it Home.
sudo nmcli connection add type wifi con-name "Home" ssid "WIFISSID" wifi-sec.key-mgmt wpa-psk wifi-sec.psk "WIFIPASSWORD"
sudo nmcli connection up "Home"- You can search for available Wi-Fi networks with
sudo nmcli device wifi list. - Make sure the network adapter is enabled with
sudo ip link set wlan0 up. Use theip acommand to list your adapters. Mine waswlan0. - Confirm that it automatically connects with the
sudo nmcli connection show "Home" | grep autoconnectcommand. You want to seeyesat the top entry.
Note: This command can be used for debugging if you cannot connect to the phone later. In my case, the network connection once did not come back after reboot. In such a case, you can use
sudo rc-service networkmanager restart.
Enabling SSH
Tho it should be enabled already by default, in case SSH is not started automatically, you can use sudo rc-service sshd start to start it manually. Check with sudo rc-service sshd status.
Installing k3s on PostMarketOS
Since Postmarket is not completly Linux and not completely Raspberry Pi, it requires tinkering to some mounts and picking specific versions and configurations for k3s.
Prerequisites
You will also have to install the following apk, because k3s needs them.
sudo apk add iptables ip6tablesA few mounts must be made for k3s to work. Run the command below to add a mount for a temporary volume that Rancher needs, to add it to fstab.
echo "tmpfs /var/lib/rancher tmpfs size=1G 0 0" | sudo tee -a /etc/fstabNote: Use
sudo mount -aor reboot the phone to apply the new fstab.
For all other mounts required for k3s, simply past the code below in the /etc/init.d/cgroups-k3s file.
#!/sbin/openrc-run

description="Mount cgroup controllers for k3s"

depend() {
    after sysfs
}

start() {
    ebegin "Mounting cgroup controllers"
    for ctrl in memory cpuset pids devices freezer; do
        if ! mount | grep -q "/sys/fs/cgroup/$ctrl "; then
            mkdir -p /sys/fs/cgroup/$ctrl
            mount -t cgroup -o $ctrl cgroup /sys/fs/cgroup/$ctrl 2>/dev/null
        fi
    done
    # cpu en cpuacct samen mounten
    if ! mount | grep -q "/sys/fs/cgroup/cpu "; then
        mkdir -p /sys/fs/cgroup/cpu
        mount -t cgroup -o cpu,cpuacct cgroup /sys/fs/cgroup/cpu 2>/dev/null
        ln -sf /sys/fs/cgroup/cpu /sys/fs/cgroup/cpuacct
    fi
    eend 0
}

stop() {
    ebegin "Unmounting cgroup controllers"
    for ctrl in memory cpuset pids cpu devices freezer; do
        umount /sys/fs/cgroup/$ctrl 2>/dev/null
    done
    eend 0
}
Check if the script will run at boot with sudo rc-update show boot | grep cgroup. The expected output is cgroups-k3s | boot, like shown below.
a40-k3s:~$ sudo rc-update show boot | grep cgroup
          cgroups-k3s | boot
a40-k3s:~$
a40-k3s:~$ mount | grep cgroup
tmpfs on /sys/fs/cgroup type tmpfs (rw,nosuid,nodev,noexec,size=4096k,nr_inodes=1024,mode=755)
cgroup on /sys/fs/cgroup/elogind type cgroup (rw,nosuid,nodev,noexec,relatime,xattr,release_agent=/usr/libexec/elogind/elogind-cgroups-agent,name=elogind)
cgroup on /sys/fs/cgroup/memory type cgroup (rw,relatime,memory)
cgroup on /sys/fs/cgroup/cpuset type cgroup (rw,relatime,cpuset)
cgroup on /sys/fs/cgroup/pids type cgroup (rw,relatime,pids)
cgroup on /sys/fs/cgroup/cpuacct type cgroup (rw,relatime,cpuacct)
cgroup on /sys/fs/cgroup/devices type cgroup (rw,relatime,devices)
cgroup on /sys/fs/cgroup/freezer type cgroup (rw,relatime,freezer)
cgroup on /sys/fs/cgroup/cpu type cgroup (rw,relatime,cpu)
a40-k3s:~$As shown above, you can confirm that the mount works with the mount | grep cgroup command. If the output is not like above, manually (re)start it with the following debugging commands.
sudo rc-service cgroups-k3s zap
sudo rc-service cgroups-k3s start
Installing k3s
After you handled all the prerequisites, you can install k3s with the following command.
curl -sfL https://get.k3s.io | INSTALL_K3S_VERSION=v1.28.5+k3s1 INSTALL_K3S_EXEC="--flannel-backend=host-gw --disable-network-policy" sh -I’m using an older version of Kubernetes (v1.28.5) because k3s v1.29+ requires cgroup v2 unified hierarchy. The A40’s downstream Samsung kernel is 4.4, which only supports cgroup v1. I’m also forcing Flannel to use the host-gw backend instead of its default VXLAN, because the kernel lacks br_netfilter, iptable_nat, and VXLAN modules required for the overlay network. Network policies are disabled for the same reason.
a40-k3s:~$ curl -sfL https://get.k3s.io | \
>   INSTALL_K3S_VERSION=v1.28.5+k3s1 \
>   INSTALL_K3S_EXEC="--flannel-backend=host-gw --disable-network-policy" \
>   sh -
[INFO]  Using v1.28.5+k3s1 as release
[INFO]  Downloading hash https://github.com/k3s-io/k3s/releases/download/v1.28.5%2Bk3s1/sha256sum-arm64.txt
[INFO]  Downloading binary https://github.com/k3s-io/k3s/releases/download/v1.28.5%2Bk3s1/k3s-arm64
[INFO]  Verifying binary download
[INFO]  Installing k3s to /usr/local/bin/k3s
sh: edge: out of range
[INFO]  Skipping installation of SELinux RPM
[INFO]  Creating /usr/local/bin/kubectl symlink to k3s
[INFO]  Creating /usr/local/bin/crictl symlink to k3s
[INFO]  Creating /usr/local/bin/ctr symlink to k3s
[INFO]  Creating killall script /usr/local/bin/k3s-killall.sh
[INFO]  Creating uninstall script /usr/local/bin/k3s-uninstall.sh
[INFO]  env: Creating environment file /etc/rancher/k3s/k3s.env
[INFO]  openrc: Creating service file /etc/init.d/k3s
[INFO]  openrc: Enabling k3s service for default runlevel
[INFO]  openrc: Starting k3s
 * Caching service dependencies ...
Error: swap is the name of a real and virtual service.                                                                                                                                                   [ ok ]
 * Starting k3s ...                                                                                                                                                                                      [ ok ]
a40-k3s:~$
Fixing kube-proxy iptables backend
After k3s is installed, you might find it crashing every few seconds. If you check the logs with sudo tail /var/log/k3s.log, you’ll likely see this fatal message:
level=fatal msg="kube-proxy exited: iptables is not available on this host"
This is because Alpine’s default iptables uses the nf_tables backend, which requires kernel features the A40’s 4.4 kernel doesn’t have. You can confirm by running:
sudo iptables -LIf it returns something like the below, you have the same issue.
# Warning: iptables-legacy tables present, use iptables-legacy to see them
iptables v1.8.13 (nf_tables): Could not fetch rule set generation id: Invalid argument
The fix is to switch to the legacy backend by repointing the symlinks.
sudo ln -sf /usr/sbin/iptables-legacy /usr/sbin/iptables
sudo ln -sf /usr/sbin/iptables-legacy-save /usr/sbin/iptables-save
sudo ln -sf /usr/sbin/iptables-legacy-restore /usr/sbin/iptables-restore
sudo ln -sf /usr/sbin/ip6tables-legacy /usr/sbin/ip6tables
sudo ln -sf /usr/sbin/ip6tables-legacy-save /usr/sbin/ip6tables-save
sudo ln -sf /usr/sbin/ip6tables-legacy-restore /usr/sbin/ip6tables-restore
Confirm with iptables --version. You’re looking for (legacy) instead of (nf_tables).
a40-k3s:~$ iptables --version
iptables v1.8.13 (legacy)
Then restart k3s:
sudo rc-service k3s restartThe nf_tables backend needs kernel 4.18+ for proper support. The legacy backend uses the older xtables interface, which has worked since kernel 2.6, so it’s the right pick for downstream Android kernels like this one.
Confirm function
After a few minutes, you should be able to see this node as a functional Kubernetes node.
a40-k3s:~$ sudo kubectl get nodes
NAME      STATUS   ROLES                  AGE   VERSION
a40-k3s   Ready    control-plane,master   15m   v1.28.5+k3s1
a40-k3s:~$
Bonus
The following things are not mandatory for function, but since this is a project for fun, you may like it.
Battery cap
Since you’re probably going to leave the phone on a charger a lot, I’d strongly advise to add a cap to the battery, to prevent swelling. Thanks to my Samsung Kernel having a store mode, I simply just enabled that on boot by editing the /etc/local.d/store_mode.start file. If you’re on Samsung, simply run the following code.
sudo tee /etc/local.d/store_mode.start > /dev/null << 'EOF'
#!/bin/sh
echo 1 > /sys/class/power_supply/battery/store_mode
EOF
Pretty Message Of The Day and ASCII Art
To make the device more yours and fun, you can edit the /etc/motd file into something you like to change the Message Of The Day that will be displayed after login.
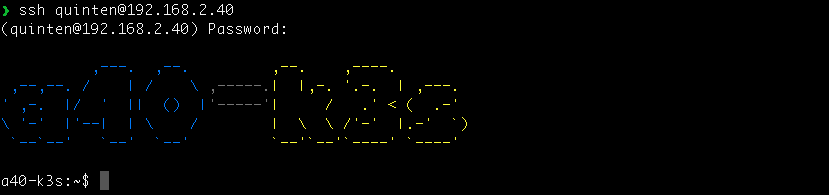
Additionally, you can create an ASCII art and put it in a shell script that runs on login, like mine below.
sudo tee /etc/profile.d/motd-banner.sh > /dev/null << 'EOF'
#!/bin/sh
printf "\n"
printf "\033[38;5;33m          ,---.  ,--.         \033[38;5;226m,--.    ,----.         \033[0m\n"
printf "\033[38;5;33m ,--,--. /    | /    \\ \033[38;5;244m,-----.\033[38;5;226m|  |,-. '.-.  | ,---.  \033[0m\n"
printf "\033[38;5;33m' ,-.  |/  '  ||  ()  |\033[38;5;244m'-----'\033[38;5;226m|     /   .' < (  .-'  \033[0m\n"
printf "\033[38;5;33m\\ '-'  |'--|  | \\    /        \033[38;5;226m|  \\  \\ /'-'  |.-'  \`) \033[0m\n"
printf "\033[38;5;33m \`--\`--'   \`--'  \`--'         \033[38;5;226m\`--'\`--'\`----' \`----'  \033[0m\n"
printf "\n"
EOF
sudo chmod +x /etc/profile.d/motd-banner.sh
Since I simply just emptied the /ect/motd and added an ASCII, mine looks like this after login.
SSH Key authentication
In a production environment, this should be the first thing you do, but since this is a fun lab project, I find it non essential and just best practice as a nice addition.